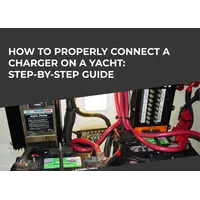
In this article topRik's experts, based on their own experience, explain how to mount a marine water maker on board a yacht. You will be guided through all the installation steps, illustrating, if possible, the process of installation a reverse osmosis desalination system. After reading this article to the end, you will be able to evaluate your own technical skills and knowledge in order to solve an important dilemma: install the watermaker yourself, guided by the instructions, or invite a specialist to do this.
Introduction
Importance of proper installation for marine water makers can hardly be overestimated - the normal operation of the equipment and its service life without breakdowns depend on nailing this process. Like any piece of equipment that has more than two parts and connects to main circuit or battery power, the watermaker cannot be installed by just using muscles. Certain knowledge, skills and compliance with safety regulations are required.
Just think about it: electrical equipment with constantly circulating water inside! It can become very dangerous if inept actions are taken during installation and subsequent testing of the system. Add to it the fact that installation errors will affect during a long voyage, leaving the crew without fresh water.
This gives rise to a whole list of installation requirements and considerations, among which the most important is the experience of the person installing it, namely:
- knowledge of safety regulations when working with electrical appliances;
- ability to read wiring diagrams;
- skills in working with tools;
- the ability to choose the right place for the installation of equipment, taking into account all the features, including - for modular equipment;
- knowledge of the principle of operation of high and low pressure pumps;
- concepts about the process of cleaning by reverse osmosis using special membranes;
- experience with filters of various degrees of purification, etc.
If you feel confident in the above set of skills and practical experience, you can take a chance and install the watermaker yourself. And if you have experience like this, you probably know that you should read the installation instructions before you start pulling all these cool things out of the box. And not after these things in the collection suddenly refuse to work.
And even after you have carefully studied the instructions and imagine the purpose of each part, as well as the whole process as a whole, it is not yet time to start installation. Start planning!
Planning the Installation
The choice of installation site is important not only for ease of maintenance, although this is also an important factor. It is enough to look at the configuration of a compact (left) and modular (right) distiller to understand that they should be mounted according to different principles.

A standard (or stationary) distiller will take up more space than a modular distiller of the same capacity, since parts of the modular model can be moved apart. It is necessary to estimate the areas and volumes of different rooms of the yacht where the watermaker can be placed.
We warn you right away: if you have a cramped engine compartment, do not risk installing a desalinator there, since the temperature in the engine room can reach or exceed +40° C, and this is dangerous for reverse osmosis membranes.
You should choose a place where accidental water leakage is excluded and there is no access to fuel vapors.
Once a location for a desalination system has been found, an assessment of the yacht's power system should be made. You may have different power supplies for marine water makers. It is unlikely that you will use models that are started by a belt from the engine - this is the prerogative of heavy ships. For a yacht, the choice usually offers a 12 or 24 V DC desalination system from a battery or 120-220 V AC from a generator.
Preparation for Installation
Only after you have studied the instructions, decided on the place and choice of power source for the desalination system, you can prepare for installation.
The first step will be gathering tools and materials. List in order all stages of installation (in writing if possible) and determine what tools and materials may be needed at each stage of the process. Our experience shows that if you take up the installation without this stage, you will have to constantly be distracted from work looking for a key of the right size, a jigsaw, a piece of plywood or metal for hinged doors, etc.
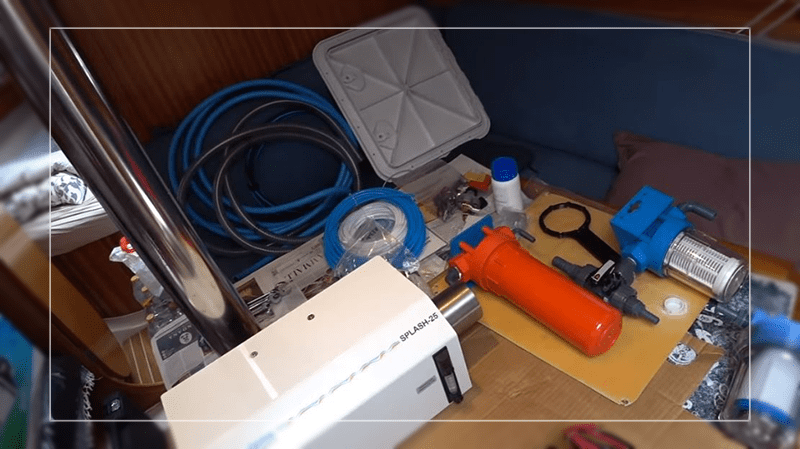
You may need to lengthen the hoses, then you will have to purchase the desired length, as well as fittings. Just keep in mind that various tees and additional valves prevent the movement of water, as a result of which the pressure in the system can drop if you get too carried away with additional tie-ins.
If a desalination system was previously installed on the yacht, removing any existing water maker components must be ensured, so that new hardware is not mistakenly connected to elements of the old system. But the existing holes can be used so as not to drill additional ones in the yacht.
And only after that you can proceed directly to the installation of marine water maker .
Installing the Pre-Filtration System
Pre-filtration does not allow larger contaminants to enter the desalination system than molecules of salts, pure water and microorganisms. Pre-filtration system consists of a coarse filter and a filter that retains fragments down to 5 microns. The pretreated water is then fed to the membranes of the reverse osmosis system.
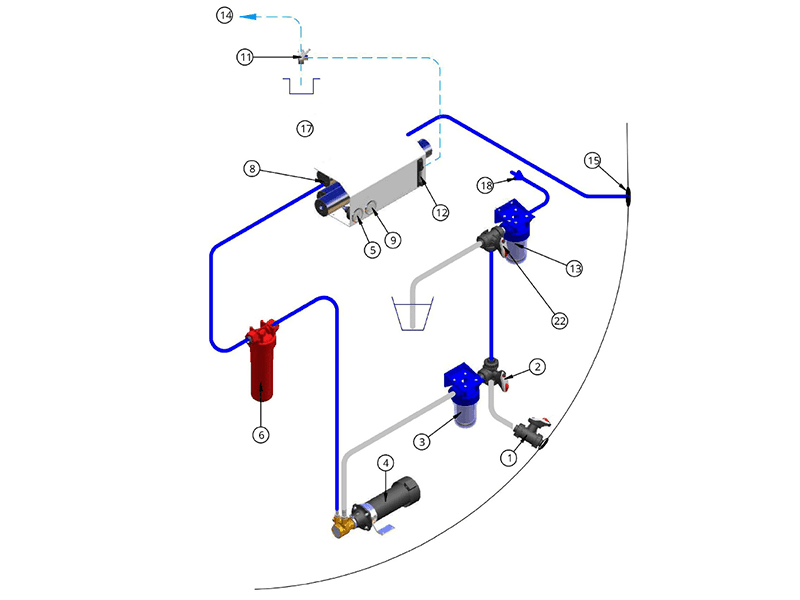
The seawater inlet shut-off valve must be below the waterline to prevent air from entering the system, which could cause the low pressure pump to cavitation. The location below the waterline applies to the pump itself, as well as to the coarse filter. And both of these parts should be as close as possible to each other, like in this diagram, where 1 is an inlet valve, 3 is a pre-filter, 4 is a low pressure pump , 6 is a 5-micron filter.
The pre-filter is best installed in an easily accessible location as it clogs quickly and needs to be cleaned regularly. If you mount the pre-filter housings just right, you will have no problem supplying water to the reverse osmosis system at the right pressure. Connecting the pre-filtration system to the yacht's water supply is made through 3-way valve.
Installing the Reverse Osmosis System
Reverse osmosis system of the marine desalinator consists of the reverse osmosis membrane and the high-pressure pump. Mounting the reverse osmosis membrane is required only in modular models - in stationary desalination plants reverse osmosis membrane is already installed out of the box.
If you have a modular model, you can separate parts of the watermaker for easy maintenance. topRik experts still recommend not to get carried away, since lengthening the hoses over 4-5 meters can lead to a decrease in pressure in the system and a decrease in its overall performance. The membrane in a suitable high pressure case (container) can be installed horizontally or vertically. In the latter version, the fresh water outlet should be at the top.
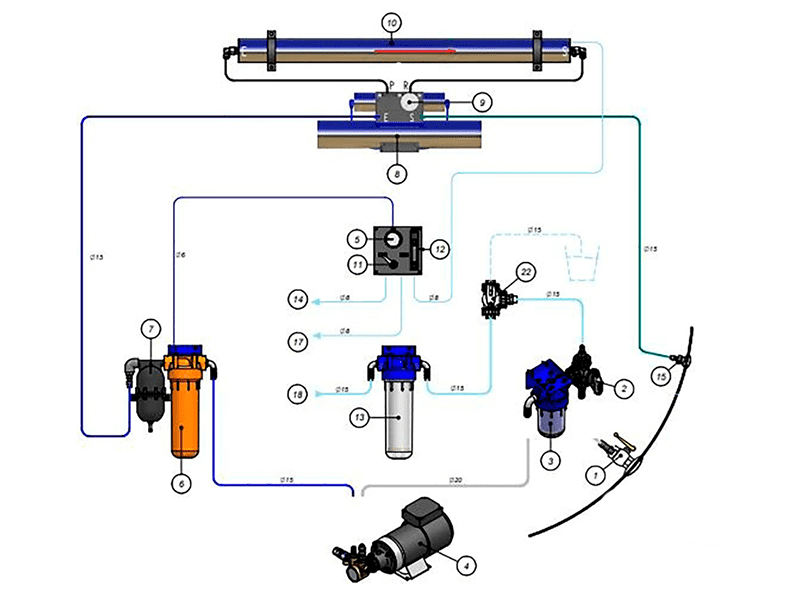
Installing the high-pressure pump is done with the help of a high-pressure pipe (hose), which connects the pump with the reverse osmosis membrane. The length of this hose must not exceed 1 meter.
Connecting the System Components
If we are talking about a modular watermaker, after mounting the preliminary filtration and reverse osmosis systems, you can go on with connecting them together. Using a high-pressure pipe, following parts are connected:
- high pressure pump outlet and 5 micron pre-filter inlet;
- prefilter outlet and high pressure pump inlet elbow;
- pump outlet with brine outlet.
The high-pressure pipe for the installation described above is pressure-resistant up to 20 bar and cannot be replaced with a random one.
After complete installation, we are connecting the device to the yacht's electrical system. Follow exactly the specifications of the connection cables specified in the instructions to prevent voltage drops and energy wastage.
Flushing and Testing the System
Testing of desalination equipment is best done on the high seas so as not to take excessively polluted water in a port or marina.
Before the first start-up, make sure that the 3-way intake valves are in the appropriate position so that the first purified water is discharged. Make sure the pumps are delivering water in the correct direction. Regularly check the pressure level on the manometer.
Then stop the feed pump and set the 3-way valve to the “flushing” position and start the pump again for a few minutes. Flushing the system with clean water is repeated until new membranes are free of preservative. The pressurized fresh water system must be turned on.
After that, the seawater desalination system is launched. Testing the system's performance and water quality is carried out using special measuring equipment: flow meter, low- and high-pressure gauges, TDS (salt meter).
Troubleshooting and Adjustments
topRik experts believe that the most common issues and their solutions marine water makers services are as follows:
- drying of membranes - occurs if you do not rinse the desalinator after each use, leave it inactive for more than 3 days. If washing with clean fresh water did not restore the performance of the equipment, then the membranes are overgrown with salts and microorganisms - they should be washed with a biocide, and if this did not help, then replace the membranes;
- low pressure gauge indicates excess pressure – it usually means that the cartridges of the primary filter and the 5-micron filter are clogged, they must be cleaned or replaced;
- the high-pressure gauge indicates an overpressure - the diaphragm is probably overgrown or damaged and needs to be replaced.
Correctly adjusting system settings to optimize performance can help eliminate these and other issues by checking your measurement equipment regularly. Each discrepancy between the parameters of the distiller (capacity, water quality, system pressure, etc.) is a sign that the equipment needs to be adjusted or repaired.
Final Checks and Inspections
To be confident in the uninterrupted work of the marine water maker, you better double-check all connections and components. All components and connections of the watermaker's hydraulic as well as electrical systems should be checked. At the same time, we recommend that you write down the results of the check-up in a table, marking the checked elements and nodes.
Ensuring compliance with safety regulations during the process of installing a watermaker lies with the owner of the yacht, or a trustee appointed by him, if the yacht is part of the charter company's fleet.